
Facebook group is a group of people with a common interest, where they can share their knowledge.
As a business owner Facebook group is an inexpensive and effective way to engage with your targeted audience and share valuable content and communicating with other members with internal chat.
Facebook Groups are classified based on:
- Topics: There are many types of groups, e.g. Job related, Marketing, personalized groups, etc.
- Privacy: Based on privacy settings, Facebook groups can be categorised in three different types,
- Public: Anyone can see the information, no need to ask for admission.
- Closed: Only group members can see the information, you must need admin approval to join the group.
- Secret: These type of groups not visible and the only way to join it is by invitation from the creator or any other member of the group.
In this post, you will discover why you should use Facebook groups for your business and how to create it.
So Let’s get started!!
Why to use Facebook Groups?
Whether you create a group or join a group managed by someone else, you’ll get multiple opportunities to increase awareness of your business by being helpful.
Being a part of a group, you’ll see people are asking lots of questions inside group.
Find out the question by which you can demonstrate your specialized skill. You can answer the question, share a helpful blog post or can introduce your products and services.
This kind of marketing is really helpful because people need answers to their questions and if you are providing solutions to them regularly, you will always be on top of their mind. People may start looking for your solutions by tagging you in comment on their questions.
Facebook allows every user to join up to 6000 groups. Here’s how you can join Facebook groups and engage with members.
How to join Facebook Group?
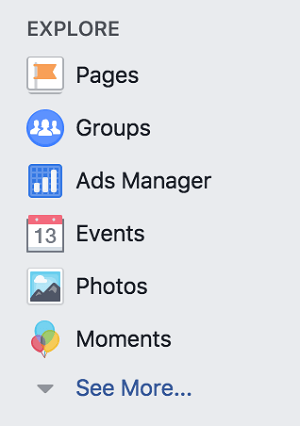
Login to your Facebook profile and find groups under the explore section from left hand side.
Once you’ll click on groups, you’ll be redirected to groups landing page. This is where Facebook gives you suggestions for group based on the pages you’ve liked, groups in which your friends are members.
As you browse through facebook suggested groups, you will find both- public and closed groups.
Click on a group you wish to join and see it’s description to know more about the group.
Make sure to read the rules before you join the group. You can find it from description area or in a post that’s been pinned to the top of the timeline. If the groups matches with what you are looking for, click ‘Join’.
If you have selected the closed group then you may have to answer some entry questions to join the group. And if admin finds it appropriate, you will get the admission.
When the group is opened to you, you can understand the tone of their conversation, what type of questions they are asking and how other members are providing solutions. After that, you will also be able to do the same.
Probably your next question is- If you can engage with your targeted customer by joining other groups then why you need to create your own group? Right?
Why you need to create your own group?
Joining a Facebook group managed by others may help you to promote your brand and business. But many group owners will have specific rules for engaging in the group. Even some groups may not allow you to promote your business.
Creating a Facebook group of your own allows you to control the entire group and use your group for a particular purpose.
Before creating a Facebook group, you need to decide why and how you’ll use it. Here are some ways you can use Facebook Group.
- You can create Facebook group of your Email Subscribers to further inspire them with helpful posts. You can share helpful articles, tips and even tutorials which can help them to improve their business or personal life.
- You can also create a group of people who have purchased your product or service. By this, members can feel exclusive and they will get an area where they can get additional information and guidelines for the product or service.
One thing you should keep in mind while creating a group. Rather than giving your brand name to your group for making it identical, it is good if you give a specific name relevant to your topic; for example, ‘Dog training tips’. It will drive specific group of people who are interested in this topic.
Once you have decided why and how you will use your group, you can start creating it.
How to create a Facebook Group?
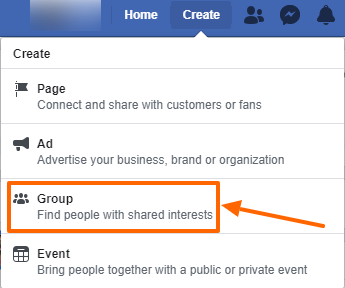
First, login to Facebook. Then, click on the ‘Create’ from the top right side and select the option ‘Group’.
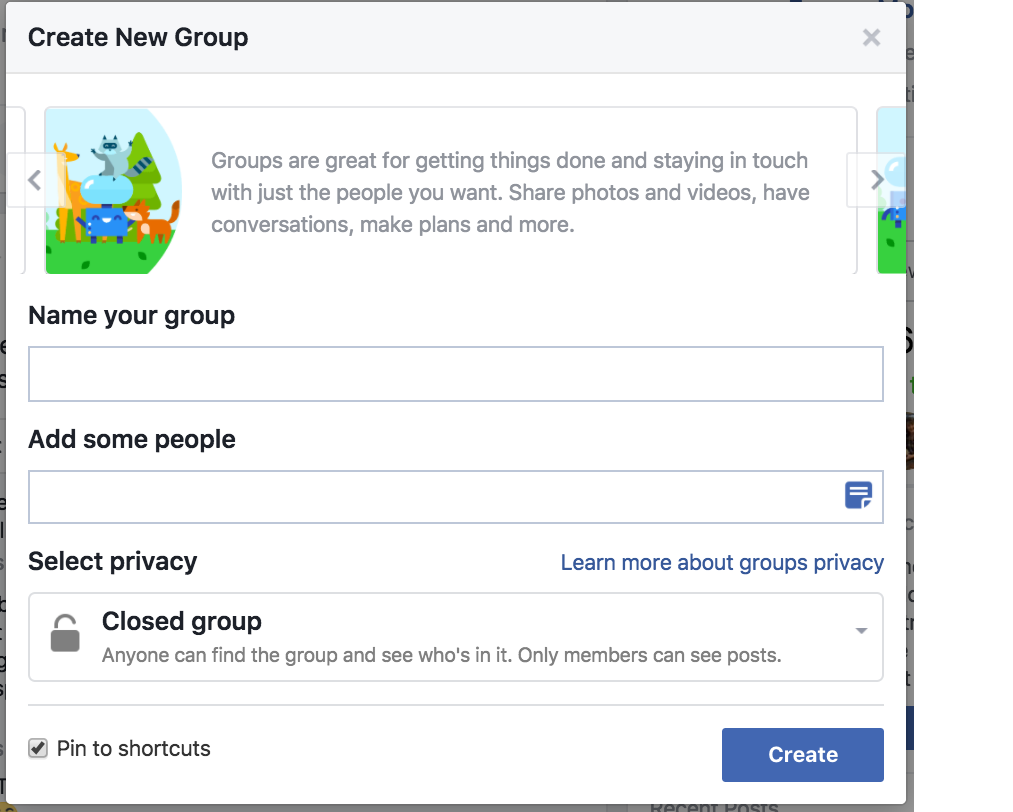
You’ll need to set up the basic information about your group.
Give a name to your group and select the privacy for your group e.g. Public, Closed or Secrete.
Most businesses are choosing Closed groups because it’s exclusive and gives people a reason to actually join to see your content. A closed group also prevents spam users.
You can also find your group in the left-hand sidebar of your facebook profile by clicking on ‘Pin to Shortcuts’.
You need to add at least one person to your group otherwise, you won’t be able to create a group. You can add your friend and you can always delete them from group later (if needed).
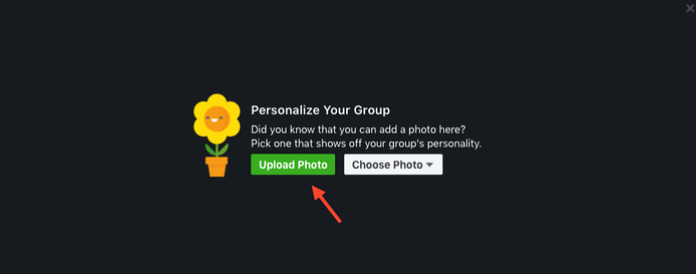
You can also select a group icon inline with your group topic so that you can be identical for your members.
Once you have created a group then you will be taken to your group page where you can customize the look and message of your group.
From the right panel, you can add a description about the group so that people can easily get an idea what this group is about.
Then you will get a field to add tags. You can choose up to 5 descriptive tags.
Now it’s time to add a cover image!
But keep in mind that the dimensions for this cover photo are different from your personal timeline or your business page. The ideal size of group cover image is 1640 x 856 pixels.
Now you are done with the basic setups for your group.
There are few more things by which your chances of being found in facebook search can be increased.
Click on ‘…’ and select ‘Edit Group Settings’.
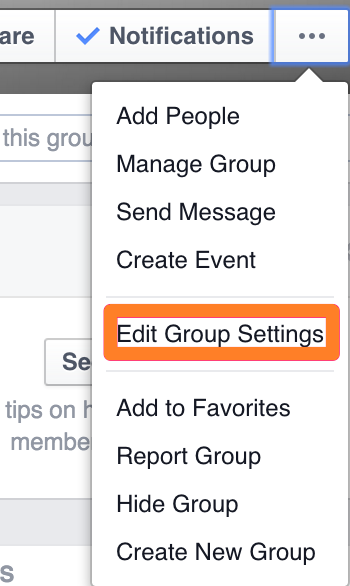
Once you click on this option, you’ll be redirected to another page where you can find a few more options like below screen.
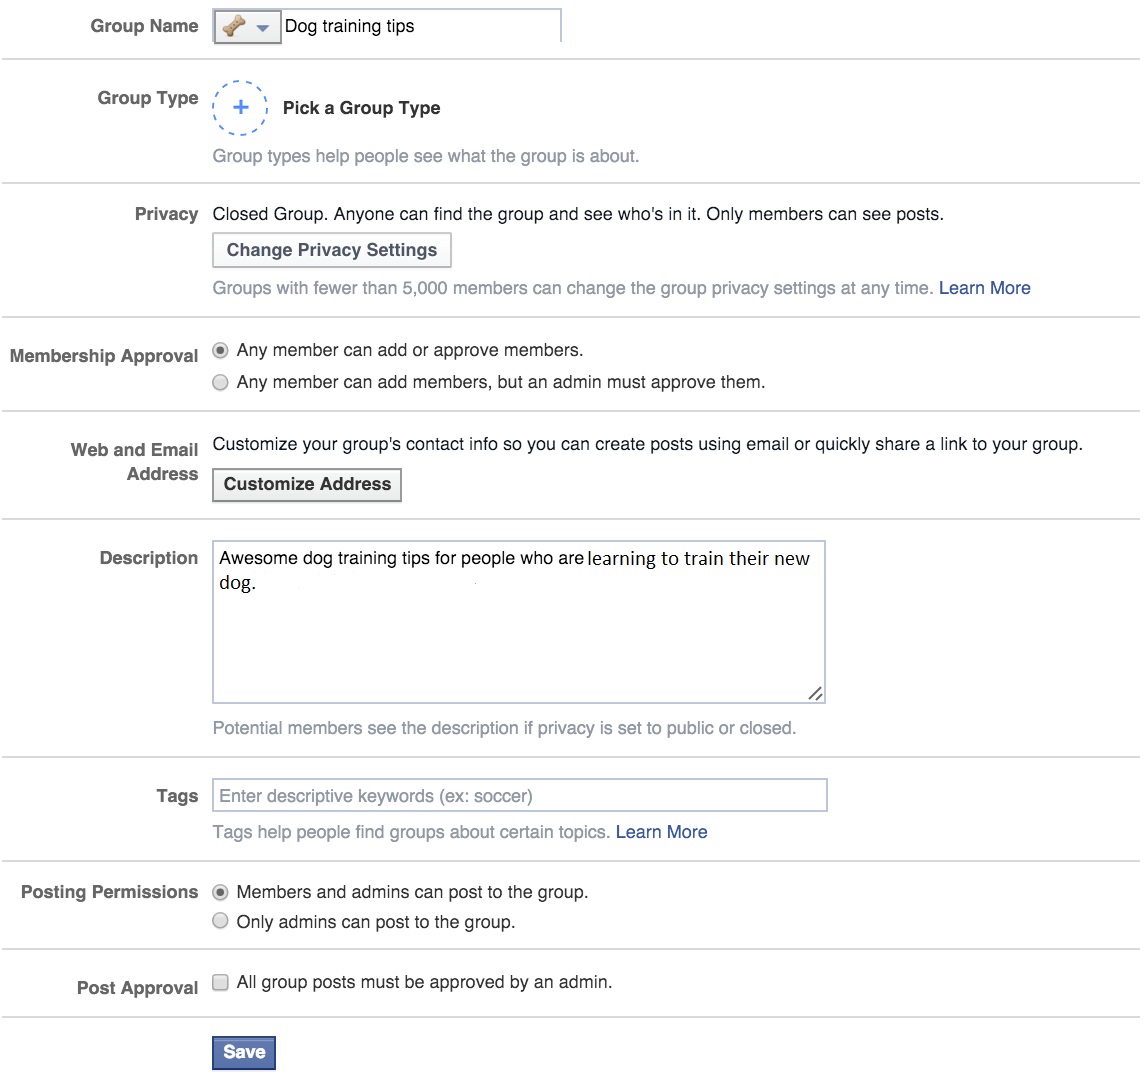
From here, you can ‘Pick a Group Type’.
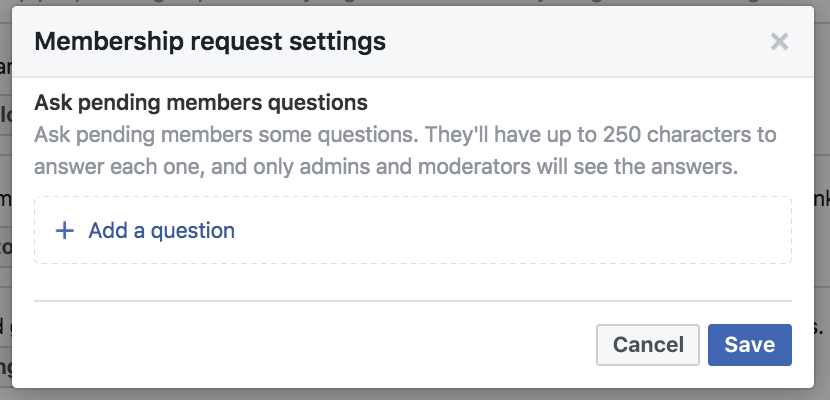
You can also ask some questions to the new people who wants to join your group. The purpose of this is you can identify potential customers for your business.
Once you are happy with all the settings, click ’Save’.
Tada!! Your Facebook group is ready to go.
How to grow Facebook Group?
A group is a private area where only members can see and discuss about the content.
Here are some ways to grow your group.
- Create a Facebook page where you can promote your group with ads or by public social media posts.
- Send an email introducing your group to your email subscribers. Don’t forget to provide a link to join your group.
- Add an invitation link for your website visitors to join your group.
- Share the invitation link of your group on all the social media channels you’re active on.
- Add a button on your website that takes people to your Facebook group’s page to join.
Facebook Group is a really effective way to take your business to the next level.
You just need to be engaged with them regularly by sharing valuable content, arranging some quizzes and live Q&As, creating a polls for your next blog topic or type of content for next month.
Will you use Facebook groups as your marketing strategy?
If you have any queries related to Facebook group, let us know in the comment section.